Pages

Showing posts with label studio calico. Show all posts

Friday, August 23, 2013

Big Announcement!!! W&W

Hi everyone!

Today is a very special day for me, and for my friend Shay.   We are excited to present to you...

Winnie & Walter will be an online store hosting craft related products by the dynamic creative duo of J.E.R.Shay and Julie Mogford.

And, what would a Big Announcement be without a little something from us to you?  Today, we have a free --- yes, I said FREE --- printable (for your personal use) available for download.  This is a 2 page PDF that includes 4 - 3x4 journaling cards, 9 circle elements, and 5 coordinating items for your favorite crafting projects.  These elements are perfect for projects like card making, scrapbooking, Project Life, mini books, and more. 

Live Laugh Love printable:


Like us on Facebook to get your copy of the Live Laugh Love Freebie!


Need ideas?  Just check out Shay's creations using these little freebies, and my Project Life pages below.  Ok, I have to let you know that I did get a little carried away, and used all of the elements in this 2 page spread except for the THANKS.  But, be looking for that to show up on the blog in the near future.


As for my Project Life pages, the first week didn't have many pictures, so the extra journaling cards were very handy to fill in spaces with bright colors and fun designs.  I was able to use a couple of circle tags on this page, but I actually cut them in half.  The first one is on the top left pocket where the word date is used on the bottom edge and the rest of the circle is used on the top edge, and I added a cute heart sticker from Studio Calico. I also cut the "hello" circle in half and tucked it behind the Monday word strip.  I used the 7gypsies pocket to hold some private journaling, but decided to put a quote I found on pinterest recently, on the quotations journal card - the quote really spoke to me right now.  Love Love Love how the arrow shapes work on the bottom two pockets: multicolor chevron pointing to my DH and the "love this" pointing to my guilty pleasure - PROJECT RUNWAY!


 On page 2, I had to get choosy with my photos, and dear sweet Kamilla won out again!  I used the spiral journal card to share some of my favorite moments from the weekend and then added the note and date circles.  I wanted to journal a bit more about Kamilla, so I fashioned another card from the Seen and Noted 6x6 paper pack by Pebbles and the colors worked great with the TODAY, love and heart elements.  I liked using the Live Laugh and Love elements to draw your eye through the page, and connect them to help tell the story.  Using the heart and ampersand worked well with the love circle, and helped to fill the empty corner of the photo.  The navy "This makes me happy" arrow that is pointing to the bouncer is no joke - I watched her bounce for hours and she was so content, and I just sat back and watched her - true happiness!!


I really like how this set turned out and love all of the possibilities it provides.  And, there is much more where that came from.  Be sure to visit us often by following this blog and Shay's blog for more to come from Winnie & Walter! Enjoy!!!


Tip: If you wish to adjust the colors of the printables, I recommend using Photoshop or Photoshop Elements.  In Photoshop Elements under Enhance pick Adjust Color and then Adjust Hue/Saturation.  You can use the bars to adjust the hue, saturation and lightness as you desire.  For more information you can check out this simple tutorial: http://www.twopeasinabucket.com/cg_display.asp?g=4&seed_id=22398

We would be thrilled to see how you used the elements in your projects, so feel free to comment with a link!

Happy Creating!!!

Julie


Supplies
Stamps: Studio Calico stamps
Ink: Clear Snap Chalk Ink - Lime Peel
Paper: Seen & Noted by Pebbles, Clippings by Basic Grey
Embellishments: American Crafts Thickers "Flat" and "Rockabye", and rubons "Ned Jr", Basic Grey Urban Letters (&), Studio Calico hearts and arrows stickers
Other: Fiskars border punch, Stampin' Write Marker by SU!, Sakura Glaze pen, 7Gypsies Pocket

Friday, July 19, 2013

Summer Card Camp 2 - Day 4: Time Challenge "Hi"


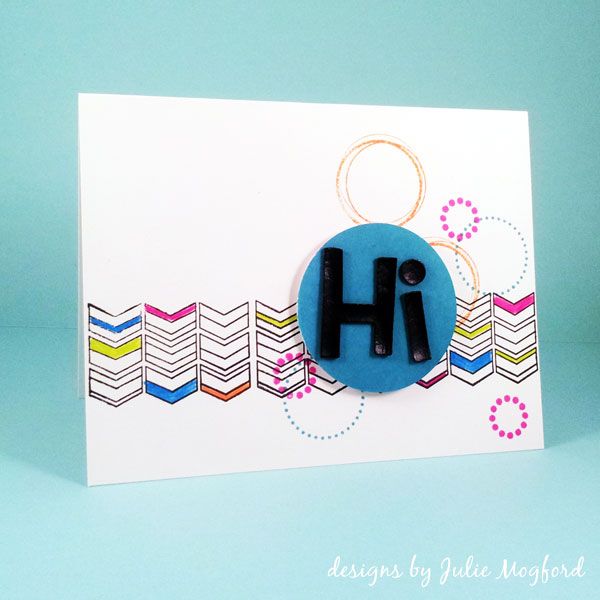
In the Online Card Classes - Summer Card Camp 2 , our challenge was to make a card in 10 minutes.  My husband won't believe this when he sees it, but I made a card in under half an hour.  I went over a little, but not too much! LOL


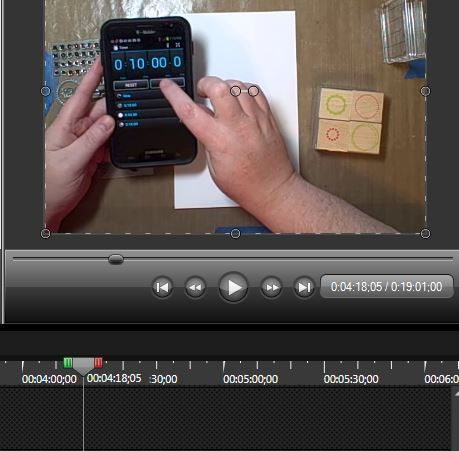
I went into my video editing program and took this screenshot.  I talked a lot at the beginning of the video which I cut most of that off.  Here is the mark where I set the 10 minute timer - the total video was 19:01 and I get to take 4:18 off of my time for babbling. That puts me at 14:43.  If I had gotten my ink and tested it earlier, I could have shaved even more time.  So YEA for me :)  FYI: I did the math on my time here.  Since my video was a little longer than 10 minutes, I am sharing it from Vimeo today.

For your viewing pleasure:

10 minute hi from Julie Mogford on Vimeo.

What I love about this card: Bright colors, bold sentiment, on trend chevron design - love love love!  And, can I just say, 10-ish minutes???  LOVE THAT!


Supplies

Stamps: Exclusive: Summer Stamp School (Studio Calico), Layering Circles (Hero Arts)
Ink: Versafine Black Onyx (Tsukineko), Distress Ink in Broken China, Picked Raspberry and Spiced Marmalade (Ranger)
Paper: Neenah Cardstock
Additional items: 2inch Marvy punch, Prismacolor Pencils, Thickers (American Crafts), Scor-Pal, Tombow tape runner, Recollections foam adhesive.


It's nice to be exercising my creative muscles again!


Summer Card Camp 2 - Day 3: Cupcake Birthday Banner


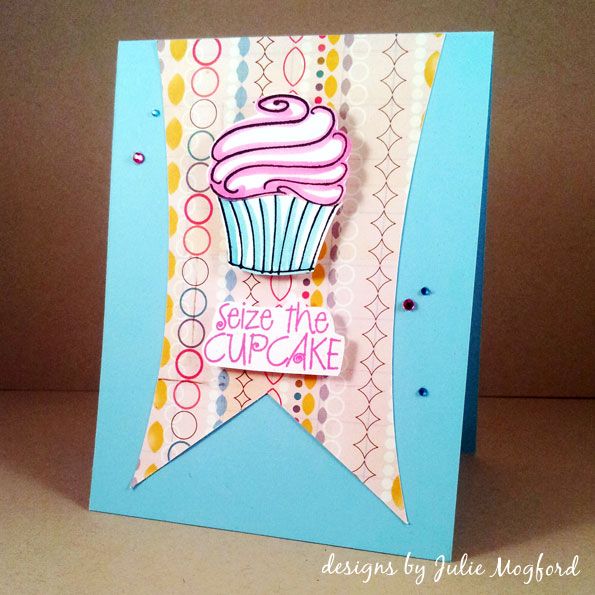
Today I have a fun birthday card based on a sketch from the Online Card Classes - Summer Card Camp 2.  It includes a rectangular banner, and I found one in my Silhouette shape library. Yea!  I wanted to use a cupcake for this card, and I found several in my stash from Hero Arts.

For your viewing pleasure:


What I love about this card: The pattern paper reminds me of paper chains my mom made last year for my sister's baby shower. The stamping is easy, and my mistakes were easily hidden. And last, but certainly not least, I love a little bling, and this time it adds to the "party" mood taking on the appearance of confetti.  Adorable!


Supplies

Stamps: Cupcake stamps and sentiment (Hero Arts), Have a delicious birthday! (Rubber Soul)
Ink: Versafine Black Onyx (Tsukineko), Distress Ink in Picked Raspberry and Tumbled Glass (Ranger)
Paper: Cardstock (Stampin' Up!), Abroad (Studio Calico)
Additional items: Aquamarker (Letraset), Banner cut (Silhouette), Scor-Pal, Tombow tape runner, Recollections foam adhesive.


Thanks for dropping by!


Julie